EXPERIMENT TO MAKE A SLIME
| Theme | Polymers, slime |
| Category | Experiments for Children, Chemistry Experiments |
| Main products | Borax, Glue |
| Short description | Making a slime is one of the most popular experiments in existence. It consists of making an elastic mass known in the old days as blandiblú, sticky mucus or slime. |
HOW TO MAKE A SLIME STEP BY STEP
Let's see how to make a slime base. I call a base slime the common slime. This slime can then be used to make slimes with other variations. This method of making a slime will work for 1 person, or to make slime in a group, for fun, for birthdays or school events. You can watch the full video here, or read the step-by-step below:
MATERIALS
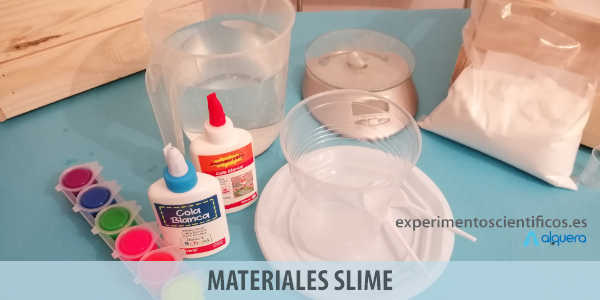
1 - Plastic cup, preferably with a capacity of 500ml (1 per child)
2 - Plastic plate, if possible smooth, without roughness (1 per child)
3 - Plastic spoon (2 per child)
4 - White glue. The best one we have tried is this one Alquera glue
5 - Food colouring or water-soluble tempera paints (do not stain hands). To be shared by the group.
6 - Borax can be purchased Alquera. You can also buy directly the slime activator, Alquera
7 - Water: Both to dissolve the borax and to dissolve the glue (2 different bottles). To be shared by the group.
8 - Protective plastic - Whether the experiments are for one child or for several, I recommend that you put a protective plastic underneath so that they stain as little as possible and collection is easier. For example, the plastic they sell in the Chinese shops to protect them when painting a house.
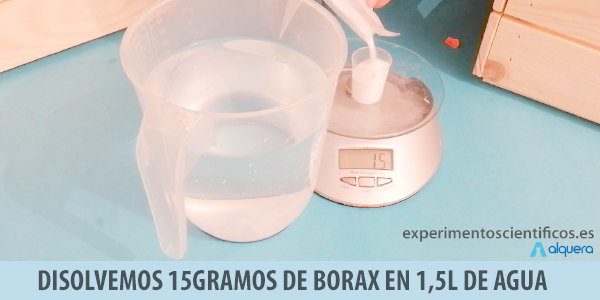
STEP 1. PREPARATION OF BORAX IN WATER.
Prepare a mixture of 15 grams of borax in 1.5L of water. 15 grams of borax would be 3 small teaspoons. If you want to see the explanation of these quantities and why it is impossible to fix the exact quantity: what is the action of borax on glue.
This amount of water will give you enough for several slimes (about 10, if you do it in a group it is perfect to use a water bottle). If you make less, pro-rate the amount of borax/amount of water.
STEP 2. PREPARING TO MAKE SLIME
Once the borax solution is ready, you can set everything up for the children to make the slime. To do this, lay the plastic on the floor and hand out a plastic cup, plate, spoon and glue to each child.
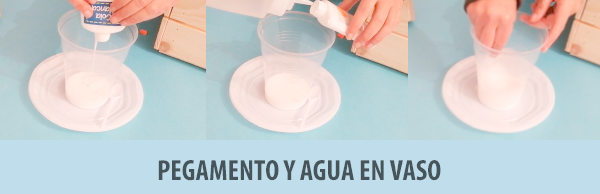
STEP 3. STARTING THE SLIME GLUE AND WATER IN THE GLASS
Pour the contents of the glue into the plastic cup.
Fill the empty glue pot with tap water and pour it into the glass as well.
Stir well, until the mixture is homogeneous.
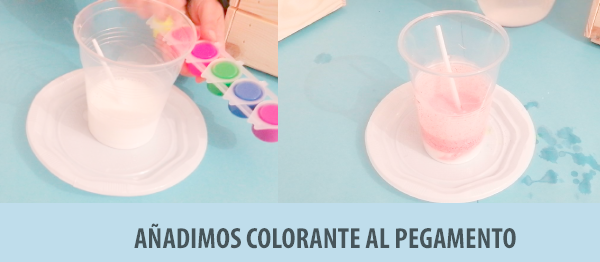
STEP 4. ADD THE COLOURING
You can use concentrated food colouring and also water-soluble children's paints, like tempera paints, which do not stain your hands. For me, soluble children's paint is my preferred option as it stains less. You can find it in practically any shop, Chinese...
In this step you can also add coloured glitter or any other accessory for the slime.
Simply pour the dye into the mixture of glue and water and stir well to get a homogeneous colour.
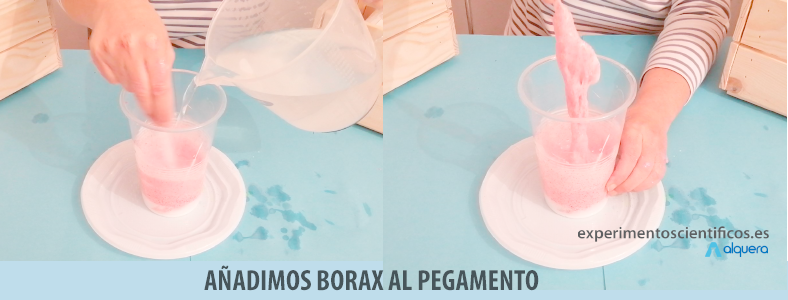
STEP 5. POUR THE BORAX INTO THE GLUE (ACTIVATE THE SLIME)
This is another decisive step and one that will determine the quality of the slime.
As the glue is stirred in the beaker, the water with borax is poured in. As you pour it in, a mass forms in the glue. Stir well with the spoon, without adding more borax, so that the borax spreads into the glue. You will see that little by little the mass gets bigger and bigger. The moment to stop adding borax is when after stirring with the spoon you have practically removed all the dough, but it is still very gelatinous. Continue stirring a little more and it will be ready to knead.
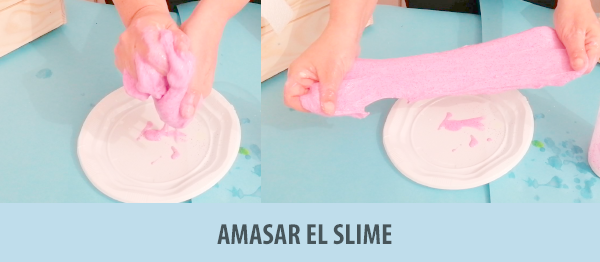
STEP 6. KNEAD THE SLIME
Now it's time to take the (very) sticky dough out of the glass and start kneading it so that it dries out and we can form the slime. No slime is the same, but if you have followed the steps well up to this point, if you knead well the slime will dry out until it sticks less and less to your hands and you get your slime.
HOW TO CORRECT SOME SLIME DEFECTS
- If when you knead the slime you see that it breaks very easily, you have too much borax. In this case, pour water over the slime and knead it again, breaking the structure so that the water is integrated into the structure.
- If when you knead the slime you see that it is still very flexible and sticky, add a little more water with borax and knead it well. You will see how the flexibility disappears.
HOW TO MAKE SLIME ON VIDEO
ON THE TOXICITY OF BORAX
In this section you can see the role of borax in the slime and its toxicity.
SLIME EXTENSIONS
If you have already made a "normal" slime, you can extend it and give it new shapes to make it a new slime in the following ways:
I loved the steps, they explain it very well and I would like to see more than just lime, for example with dessert recipes etc.